


Lower your ping by disabling Nagle’s algorithm
By default Windows uses the Nagle’s algorithm when handling messages. That means that in order for your connection to send a message, that message needs to be at least the size of MSS (maximum segment size), which in most cases it is inefficient when dealing with small sized packets and situations that deal with real-time systems. Because these reasons disabling Nagle’s algorithm can considerably lower your latency/ping.
In order to disable Nagle’s algorithm simply following these steps:
- Open up the Registry Editor.
Click start --> Runand type in regedit - Navigate to the following key HKEY_LOCAL_MACHINE\SYSTEM\CurrentControlSet\services\Tcpip\Parameters\Interfaces
- You will notice that there are a few interfaces with the following format:
{XXXXXXXX-XXXX-XXXX-XXXX-XXXXXXXXXXXX}. Simply navigate to all of them and look for clues (usually the value of DhcpIPAddress) that will indicate which is your default interface. Alternative you can do the next steps for all interfaces that are not empty if you want to disable Nagle’s algorithm on all devices. - Right click on an empty space in the right window and select New –> DWORD (32-bit) Value and set its name to TcpAckFrequency. Then double click the key in order to modify it and change its
value datato 1 - Repeat step 4 but this time set the name of the DWORD (32-bit) Value key to TCPNoDelay. Then again make sure to modify the key and change its
value datato 1 - Restart your Windows and you are done!


Posted in Software Tips.
Tagged latency, Nagle's algorithm, tcp, TcpAckFrequency, TCPNoDelay
Calculate file checksum
You might have noticed by now that a lot of websites list their files checksum values in their downloads section. Checksums are extremely useful when you want to verify that the file you have downloaded from another source is indeed the same file that is hosted on the official website and that it has not been altered in any way.
For this very reason I’ve put together a method that will generate the checksum of the file of your choice. Simply provide the location of the file and the algorithm you wish to compute the checksum with.
1 2 3 4 5 6 7 8 9 10 11 | private string GetFileChecksum(string file, HashAlgorithm algorithm) { string result = string.Empty; using (FileStream fs = File.OpenRead(file)) { result = BitConverter.ToString(algorithm.ComputeHash(fs)).ToLower().Replace("-", ""); } return result; } |
Examples:
1 2 3 4 5 6 7 8 9 10 11 | // a3ccfd0aa0b17fd23aa9fd0d84b86c05 string MD5checksum = GetFileChecksum("c:\\myfile.exe", new MD5CryptoServiceProvider()); // 89c19274ad51b6fbd12fb59908316088c1135307 string SHA1checksum = GetFileChecksum("c:\\myfile.exe", new SHA1CryptoServiceProvider()); // d4ffa4559a1e22167933772d82cf714cd4bb7a0e79511c2424e18bdb619d63a4 string SHA256checksum = GetFileChecksum("c:\\myfile.exe", new SHA256CryptoServiceProvider()); // 3906661b755f22965182f9d1b6f6175cda557c1c66722c60a68037960fc55373586d7db8b24690af212c34ac6df125f08932a24e47ae0f7d6cb2822d8bea4e0f string SHA512checksum = GetFileChecksum("c:\\myfile.exe", new SHA512CryptoServiceProvider()); |
Posted in C#.
Tagged C#, checksum, csharp, HashAlgorithm, snippet, System.Security.Cryptography, winforms
Upload file to FTP
This is a simple method that will allow you to upload a file of your choice to an FTP server.
1 2 3 4 5 6 7 8 9 10 11 12 13 14 15 16 17 18 19 20 21 22 23 24 25 26 | private void UploadFtpFile(string filePath, string url) { FileInfo fileInfo = new FileInfo(filePath); FtpWebRequest request = (FtpWebRequest)WebRequest.Create(url); request.Method = WebRequestMethods.Ftp.UploadFile; request.Credentials = new NetworkCredential("ftp username", "ftp password"); request.UseBinary = true; request.ContentLength = fileInfo.Length; using (FileStream fs = fileInfo.OpenRead()) { byte[] buffer = new byte[2048]; int bytesSent = 0; int bytes = 0; using (Stream stream = request.GetRequestStream()) { while (bytesSent < fileInfo.Length) { bytes = fs.Read(buffer, 0, buffer.Length); stream.Write(buffer, 0, bytes); bytesSent += bytes; } } } } |
Keep in mind that you will want to do some error catching to ensure that the file exists, the server is responding and so on.
Simply call the method as follows:
1 | UploadFtpFile("C:\\file_to_upload.jpg", "ftp://example.com/myfolder/name_of_file.jpg"); |
Download file from FTP
I’ve created a simple method for you that will download a file from an FTP server and save it in the location you wish.
1 2 3 4 5 6 7 8 9 10 11 12 13 14 15 16 17 18 19 20 21 22 23 24 25 | private void DownloadFtpFile(string url, string savePath) { FtpWebRequest request = (FtpWebRequest)WebRequest.Create(url); request.Method = WebRequestMethods.Ftp.DownloadFile; request.Credentials = new NetworkCredential("ftp username", "ftp password"); request.UseBinary = true; using (FtpWebResponse response = (FtpWebResponse)request.GetResponse()) { using (Stream rs = response.GetResponseStream()) { using (FileStream ws = new FileStream(savePath, FileMode.Create)) { byte[] buffer = new byte[2048]; int bytesRead = rs.Read(buffer, 0, buffer.Length); while (bytesRead > 0) { ws.Write(buffer, 0, bytesRead); bytesRead = rs.Read(buffer, 0, buffer.Length); } } } } } |
Keep in mind that ideally you will want to do some error catching for cases that the file does not exist or the server is down and so on.
Simply call the method as follows:
1 | DownloadFtpFile("ftp://example.com/path_to_my_image_or_file.jpg", "C:\\location_and_name_of_file.jpg"); |
Posted in C#.
Tagged C#, csharp, ftp, ftp download file, FtpWebRequest, FtpWebResponse, snippet, winforms
Custom form background color
Winforms by default don’t offer much customization as far as coloring, especially when it comes down to gradient patterns.
If you want to change the background of your form to something a bit more unique to make it look like this
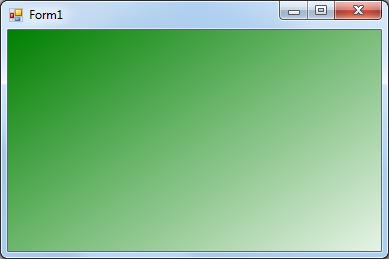
then simply follow steps below.
First handle the form’s Paint event.
1 2 3 4 5 6 7 8 | private void Form1_Paint(object sender, PaintEventArgs e) { Graphics g = e.Graphics; Rectangle rect = new Rectangle(0, 0, this.Size.Width, this.Size.Height); LinearGradientBrush brush = new LinearGradientBrush(rect, Color.Green, Color.White, LinearGradientMode.ForwardDiagonal); g.FillRectangle(brush, rect); brush.Dispose(); } |
Feel free to change the colors and the gradient direction to what you would like.
Posted in C#.
Tagged C#, csharp, custom form background color, form background color, snippet, winforms