


How to create a swap file on Ubuntu

Swap is particularly useful in situations where physical memory is limited, especially when dealing with low memory VPS/systems. This does not mean that swap is useless in all the other situations. Any system with close to 100% RAM utilization without swap enabled will cause application crashes or even worse, a system crash.
Moreover, some applications, in rare cases, require swap to be enabled regardless of memory capacity/usage, otherwise they simply crash.
To enable swap on Ubuntu follow the steps below (requires administration rights):
Create an empty file called “swapfile” using fallocate:
1 | fallocate -l 2G /swapfile |
Feel free to change the “2G” value if you believe you require more or less swap space.
Change the permissions of the swap file to 600 in order to make it accessible only for the root user:
1 | chmod 600 /swapfile |
Mark the “swapfile” as swap space:
1 | mkswap /swapfile |
Enable the swap file:
1 | swapon /swapfile |
Note: It is extremely important to note that any changes we have made so far are temporary and will be removed when we reboot the machine.
In order to make our changes permanent we will need to update the fstab file located at /etc/fstab. You can do so by editing the file and adding the following line inside:
1 | /swapfile none swap sw 0 0 |
Or simply by using this command do insert the line for you in the file:
1 | echo '/swapfile none swap sw 0 0' | sudo tee -a /etc/fstab |
We put together a one line command using the instructions above. It comes in handy when deploying new machines and we want to speed up the process. Feel free to use and modify it to suit your needs.
1 | fallocate -l 2G /swapfile && chmod 600 /swapfile && mkswap /swapfile && swapon /swapfile && echo '/swapfile none swap sw 0 0' | sudo tee -a /etc/fstab |


Wake-on-Lan (WoL) in C#
Wake on LAN is a computer networking standard that allows devices to be powered on when they receive a specific network message, if your device supports this feature.
In this example we will demonstrate how to craft this “magic” packet in C#. The concept of the packet is fairly simple. The packet must contain anywhere in the payload six (6) 255 bytes in a row (FF in hexadecimal) followed by the MAC address of the device repeated sixteen times.
As an example, if your device MAC address is 01-00-00-00-00-02 the payload will look like this:
1 | FFFFFFFFFFFF010000000002010000000002010000000002010000000002010000000002010000000002010000000002010000000002010000000002010000000002010000000002010000000002010000000002010000000002010000000002010000000002 |
You can find the implementation of WoL in C# below:
1 2 3 4 5 6 7 8 9 10 11 12 13 14 15 16 17 18 19 20 21 22 23 24 25 26 27 28 29 30 31 32 33 | var macAddress = "01-00-00-00-00-02"; // Our device MAC address macAddress = Regex.Replace(macAddress, "[-|:]", ""); // Remove any semicolons or minus characters present in our MAC address var sock = new Socket(AddressFamily.InterNetwork, SocketType.Dgram, ProtocolType.Udp) { EnableBroadcast = true }; int payloadIndex = 0; /* The magic packet is a broadcast frame containing anywhere within its payload 6 bytes of all 255 (FF FF FF FF FF FF in hexadecimal), followed by sixteen repetitions of the target computer's 48-bit MAC address, for a total of 102 bytes. */ byte[] payload = new byte[1024]; // Our packet that we will be broadcasting // Add 6 bytes with value 255 (FF) in our payload for (int i = 0; i < 6; i++) { payload[payloadIndex] = 255; payloadIndex++; } // Repeat the device MAC address sixteen times for (int j = 0; j < 16; j++) { for (int k = 0; k < macAddress.Length; k += 2) { var s = macAddress.Substring(k, 2); payload[payloadIndex] = byte.Parse(s, NumberStyles.HexNumber); payloadIndex++; } } sock.SendTo(payload, new IPEndPoint(IPAddress.Parse("255.255.255.255"), 0)); // Broadcast our packet sock.Close(10000); |
And the result…
![]()
Feel free to leave your questions or feedback in the comment section below.
Automatically check for MikroTik software updates
If you own multiple MikroTik devices (or even one) you already know how annoying and time consuming it is to keep checking if there are new updates available for your devices all the time.
The purpose of this tutorial is to help you setup your devices in order to receive an email notification if a new software update is available to download for your device.
Step 1
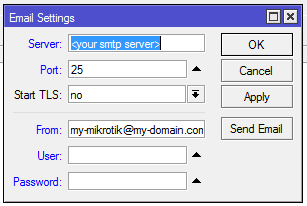
First of all, we need to setup the SMTP settings of your MikroTik device to allow it to send emails when required.
Using WinBox, or the web interface, navigate to Tools --> Email and change your settings as shown in the image below. Please note that the image contains sample data and requires from you to change the settings with a working SMTP as well the correct credentials, if required.
If you prefer to use the CLI over the web interface or WinBox, you can use the command below:
1 | /tool e-mail set address=smtp.my-domain.com from=mikrotik@my-domain.com password=mypassword port=25 user=myusername |
Make sure to send a test email to verify that everything is working properly.
Step 2
Now that our MikroTik device is able to send emails it is time to create our script which will be responsible for checking for new updates and sending us an email if one is available.
Navigate to System --> Scripts, click Add, change the title to “Check for software updates” or to something else if you prefer (don’t forget the name, you will need it in step 3) and finally, paste the following script in the source area:
1 2 3 4 5 6 7 8 9 10 11 | /system package update set channel=stable check-for-updates :if ([get installed-version] != [get latest-version]) do={ :log info "A new software update is available. Sending email..." /tool e-mail send to="$emailAddress" subject="[Mikrotik] Software Update Available" body="A new update is available for your MikroTik device" } |
CLI Version (pay attention to the highlighted line)
1 2 3 4 5 6 7 8 9 10 11 12 13 | /system script add name="Check for software updates" owner=<your username> policy=ftp,reboot,read,write,policy,test,password,sniff,sensitive,romon source=":local emailAddress \"[email protected]\"\r\ \n\r\ \n/system package update\r\ \nset channel=stable\r\ \ncheck-for-updates\r\ \n\r\ \n:if ([get installed-version] != [get latest-version]) do={ \r\ \n:log info \"A new software update is available. Sending email...\"\r\ \n\r\ \n/tool e-mail send to=\"\$emailAddress\" subject=\"[Mikrotik] Software Update Available\" body=\"A new update is available for your Mikrotik device\"\r\ \n}\r\ \n" |
Step 3
It is time for the last step. In order for everything to work properly, we need to trigger our script every now and then in order for the update check to take place. To accomplish this, we will use the scheduler feature which is located under System --> Scheduler
Simply add a new scheduled task, give it a name and specify how often it should run in the interval section (I run mine with a 2d 00:00:00 interval).
In the “On Event” section paste the line below.
1 | /system script run "Check for software updates" |
Important: Make sure the name of the script is exactly the same as the one you have created in step 2!
CLI Version
1 2 | /system scheduler add interval=2d name="Check for software update" on-event="/system script run \"Check for software updates\"" policy=ftp,reboot,read,write,policy,test,password,sniff,sensitive,romon start-date=dec/24/2016 start-time=00:00:00 |
And you are done! If you have successfully followed this example your MikroTik device will check every 2 days for new updates and will let you know by email if one is available.
This method has been tested in the last few versions of RouterOS (currently 6.38). For older versions you might need to alter the script functions a bit to get everything working correctly.
If you have any questions don’t hesitate to ask them in the comment section below.
Update: As of v6.43.7 the release channels have been renamed. If you want to use the above script on a MikroTik that is running an older RouterOS version you will need to use the old software update channel name.
For RouterOS equal or newer than v6.43.7
1 | set channel=stable |
For RouterOS older than v6.43.7
1 | set channel=current |
* release channels renamed – “bugfix” to “long-term”, “current” to “stable” and “release candidate” to “testing”
Posted in Network.
Tagged MikroTik, RouterBoard
Using PowerShell to backup your MySQL databases

A few months ago we had to find a way to backup our MySQL databases, both remotely and locally. Instead of trying to find a software that did something similar I decided to write a few lines of code that solved our problem. Why spend time and money evaluating software when can create your own solution to the problem with little to no cost, right ?
The snippet below is fairly simple. The $databases variable holds an array of all the databases you want to dump. You will need to specify the database name, the path you wish to save the backup and the backup filename. I took the liberty of commenting the code in order to make it a bit more clear.
Please keep in mind that this solution uses mysqldump. This executable is usually located under C:\Program Files\MySQL\MySQL Server 5.6\bin, assuming you have MySQL server installed. In addition to mysqldump, since all our Windows servers we have WinRAR installed, this snippet uses WinRAR in order to compress the database files. You can always modify the code either skip the compression or to use .NET’s ZipFile class or 7zip.
This solution still needs some tweaking. For example, creating a temporary file with the passwords and passing it as an argument to mysqldump to avoid the “Specifying a password on the command line should be considered insecure” message, as well as some code cleanup and error catching. Until then, you are free to modify this example to better suit your needs.
If you have any questions feel free to post them in the comment section below.
1 2 3 4 5 6 7 8 9 10 11 12 13 14 15 16 17 18 19 20 21 22 23 24 25 26 27 28 29 30 31 32 33 34 35 36 37 38 39 40 41 42 43 44 45 46 47 48 49 50 51 52 53 54 55 56 57 58 59 60 61 62 63 64 65 66 67 68 69 70 71 72 73 74 75 76 77 78 79 80 81 82 83 84 85 86 87 88 89 90 91 92 93 94 95 96 97 98 99 | function ZipAndDeleteFile([string] $file, [string] $saveLocation) { $command = [string]::Format("`"{0}`" a -ep -df `"$saveLocation`" `"$file`"", $winrarPath); iex "& $command"; } function GetCurrentDateTime { return Get-Date -Format yyyyMMdd_HHmmss; } Class DatabaseEntry { [string] $DatabaseName; [string] $DatabaseBackupPath; [string] $DatabaseFilename; DatabaseEntry([string] $databaseName, $databaseBackupPath, $databaseFilename) { $this.DatabaseName = $databaseName; $this.DatabaseBackupPath = $databaseBackupPath; $this.DatabaseFilename = $databaseFilename; } } $debugMode = $false; # Show errors from mysqldump $winrarPath = "C:\Program Files\WinRAR\WinRAR.exe"; # Path to WinRAR $logFilePath = "C:\Database Backups\"; # Folder where the log file will be created in $logFileName = "backup_log.log"; # Filename of the log file $logFileFullPath = [io.path]::combine($logFilePath, $logFileName); # The full path of the log file (ignore this, it will get populated from the 2 variables above) $mysqlDumpLocation = "C:\MySQL\mysqldump.exe"; # Path to the mysqldump executable. This is required in order to be able to dump the databases. <# The path where the database files will be stored. This is simply here to speed up the assigning of paths for the DatabaseEntry objects. You can set an entirely different path for each database. #> $databaseBackupLocation = "C:\Database Backups\MySQL"; $databaseIp = "<Your MySQL server IP>"; # Database IP or Hostname $databaseUsername = "<MySQL User>"; # Database username (it should have access to all the databases you need to backup) $databasePassword = "<MySQL password for user>"; # The password of the user <# Here is where you specify which databases you want to backup. The DatabaseEntry object takes three arguments: 1) The database name, this should match the name of the database you have in your MySQL server 2) The path where you want the database to be stored (without the filename) 3) The filename of backup file without the extension (a timestamp will be added automatically so you do need to worry about it) #> $databases = New-Object System.Collections.ArrayList; [void]$databases.Add([DatabaseEntry]::New("database1", [io.path]::combine($databaseBackupLocation, "database1_foldername"), "database1")); [void]$databases.Add([DatabaseEntry]::New("database2", [io.path]::combine($databaseBackupLocation, "database2_foldername"), "database2")); [void]$databases.Add([DatabaseEntry]::New("database3", [io.path]::combine($databaseBackupLocation, "database3_foldername"), "database3")); md -Force $logFilePath | Out-Null # Create the path for the log file Out-File $logFileFullPath -InputObject "Starting backup operation" -Append; # Iterate and process all the database entries foreach ($database in $databases.GetEnumerator()) { try { Out-File $logFileFullPath -InputObject ([string]::Format("Backing up {0}...",$database.DatabaseFilename)) -Append; $date = GetCurrentDateTime; md -Force $database.DatabaseBackupPath | Out-Null $saveFilePath = [string]::format("{0}\{1}_{2}.sql", $database.DatabaseBackupPath, $database.DatabaseFilename, $date); $command = [string]::format("`"{0}`" -u {1} -p{2} -h {3} --quick --default-character-set=utf8 --routines --events `"{4}`" > `"{5}`"", $mysqlDumpLocation, $databaseUsername, $databasePassword, $databaseIp, $database.DatabaseName, $saveFilePath); $mysqlDumpError; Invoke-Expression "& $command" -ErrorVariable mysqlDumpError; # Execute mysqldump with the required parameters for each database # If debug mode is on then you will see the errors mysqldump generates in the log file. if ($debugMode -eq $true) { Out-File $logFileFullPath -InputObject $mysqlDumpError -Append; } $zipFileLocation = [string]::format("{0}\{1}_{2}.zip", $database.DatabaseBackupPath, $database.DatabaseFilename, $date); ZipAndDeleteFile $saveFilePath $zipFileLocation; # Zip the file and delete the file that was zipped. $logEntry = [string]::Format("[{0}] Successfully backed up {1}", $date, $database.DatabaseName); Out-File $logFileFullPath -InputObject $logEntry -Append; } catch [Exception] { $exceptionMessage = $_.Exception.Message; $logEntry = [string]::Format("[{0}] Failed to backup up {1}. Reason: {2}", $date, $database.DatabaseName, $exceptionMessage); Out-File $logFileFullPath -InputObject $logEntry -Append; } } Out-File $logFileFullPath -InputObject "Backup operation completed" -Append; |

Posted in PowerShell.
Tagged database, MySQL, PowerShell
Create a MySQL table dynamically in C#

Sometimes you might need to create database tables dynamically, based on new users, products etc. The snippet below allows you to do exactly that, create a new table in your database dynamically, straight from your code.
This example is heavily based on How to connect to a MySQL database and retrieve data in C# as the same concept of connecting to the database is required.
The first thing you need to do, as mentioned in the article linked above, is that you will need to add a reference to MySQL.Data in your project. After you have done that, you can modify the snippet below to create the table with the columns you want based on your requirements.
1 2 3 4 5 6 7 8 9 10 11 12 13 14 15 16 17 18 19 20 21 22 23 24 25 26 | string createTableQuery = string.Format(@"CREATE TABLE `{0}` ( `sid` smallint(5) unsigned NOT NULL AUTO_INCREMENT, `name` varchar(120) NOT NULL DEFAULT '', `title` varchar(120) NOT NULL DEFAULT '', `description` text NOT NULL, `optionscode` text NOT NULL, `value` text NOT NULL, `disporder` smallint(5) unsigned NOT NULL DEFAULT '0', `gid` smallint(5) unsigned NOT NULL DEFAULT '0', `isdefault` tinyint(1) NOT NULL DEFAULT '0', PRIMARY KEY (`sid`), KEY `gid` (`gid`)) ENGINE = MyISAM AUTO_INCREMENT = 1 DEFAULT CHARSET = utf8;", "YourTableName"); string serverIp = "<Server IP or Hostname>"; string username = "<DB username>"; string password = "<DB password>"; string databaseName = "<DB name>"; string dbConnectionString = string.Format("server={0};uid={1};pwd={2};database={3};", serverIp, username, password, databaseName); var conn = new MySql.Data.MySqlClient.MySqlConnection(dbConnectionString); conn.Open(); var cmd = new MySql.Data.MySqlClient.MySqlCommand(createTableQuery, conn); cmd.ExecuteNonQuery(); |
If you are unsure as to which database engine to use, please take a look at https://dev.mysql.com/doc/refman/5.0/en/storage-engines.html as every database engine has different type of limitations, so it is better to choose the one that better suits your needs.
